Today I want to share a tutorial on how to align angles – specifically for any of you using my Triangler ruler (so any projects from the books Angles with Ease and Angles with Ease 2 or the pattern Summer Stars). My experience with teaching has been that once the angle is changed from the standard 45 or 90 degrees, many people have no idea what to do, so they just kinda wing it. Sometimes it works, but most of the time the points are chopped off, don’t meet, or they end up with A, B, or C cups. Sound familiar? And in this case, a C cup is not better than an A cup. In fact, totally flat is best. Case in point? A cup to the left, flat on the right.

But – getting back to what I started talking about – How to align angles. The technique that I’m going to explain works for many different angles. For example, all of the rulers shown below cut different angles, but you would align them all using the same technique.

The samples that I have prepared to show the technique all use my Triangler ruler. First up, just sewing two triangles together.

Nothing complicated here – just lay them right sides together, align them evenly at the top and bottom, and sew. This is the easiest of the angles to line up and sew.

The main thing to watch out for here is that you sew with a perfect 1/4″ seam allowance and that you have cut the top point accurately. If you don’t have the little flat top of the ruler aligned perfectly with the top of the strip when you cut, it will throw you off in two ways. If there is excess fabric to the top of the flat point, your point will not be 1/4″ from the raw edge of the block after you have sewn the triangles together. Then, if you alter your seam allowance to make sure that the points meet in the center of the block, that will cause your block not to lay flat. You also want to be careful when working with the bias edges because if the bias gets stretched out, that can also cause your block to be wavy and not lay flat.
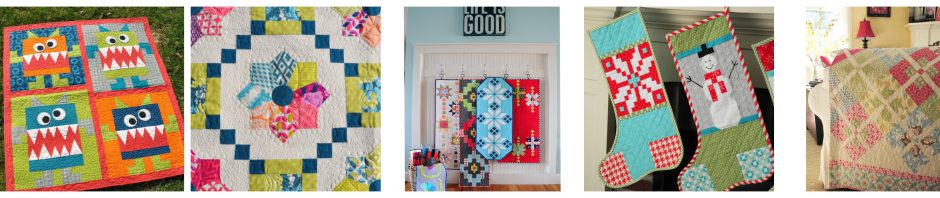
The following quilts are made by sewing these tall triangles together in pairs as shown above, then sewing the 4 pairs together to make a block.
If you take that same ruler and cut up a skinnier strip, you get pieces that look like this. I am going to sew them together as laid out below.

Lay them right sides together and align as shown.

The trick to knowing exactly how to align them is to make sure that your 1/4″ seam allowance aligns perfectly with the valley at the top and bottom of the pieces. Do you see the valley? It’s very important that you know what I mean by a “valley”. Now do you see the little yellow dash in the bottom of the valley? That is where your 1/4″ seam allowance needs to be – right in the middle of the valley.

I think the easiest way to see this is to draw a 1/4″ seam allowance on the block. Then slide the piece up and down until it lines up perfectly with the valley, as shown below.

In this sample you can see that the 1/4″ seam allowance isn’t lined up with the valley because the red piece is way too high

In this sample you can see that the 1/4″ seam allowance isn’t lined up with the valley because the red piece is way too low.

You won’t need to draw the seam allowance on every piece that you line up – it just helps as a guide until you get the hang of the technique. Another thing that helps is to set your sewing machine so that the needle is always down. Then you can see right away if your valley is going to line up with the 1/4″ seam allowance. See the sample below – I have made the needle bright yellow so you are sure to see it. I also put a yellow dash in the valley so you can see how they line up. See how much easier that makes it? If your needle is left up, you have to reference point and keeping the needle down gives you something to watch for.

After sewing and pressing, the top edge of the unit should be nice and straight (see sample in the top part of the photo below) – not jagged (as shown in the bottom of the photo below). If you unit looks like the one in the bottom of the photo, you just need more practice aligning the valley with the 1/4″ seam allowance.

Now let’s practice the angle again – this time by sewing two half triangles to a full triangle.

The concept is the same – Lay right sides together, and line up the valley with the 1/4″ seam line. With these pieces, the valley is harder to see

It’s there – you just have to look a littler harder to see it. It’s a teeny, tiny, baby valley. But again – the concept is the same. You need to align the valley with the 1/4″ seam allowance.

I think one of the things that gets people confused, is that after they press, their point isn’t exactly in the corner of the block. See how the point is about 1/8″ in from the right bottom corner?

Depending on the angle you are working with, this distance will vary a bit, but the trick is that after you sew a 1/4″ seam allowance on both sides, then the point will be right in the corner. On the sample below, I have drawn in the 1/4″ seam allowance and you can see how the point is perfectly in the corner now. That’s how it’s supposed to work. (I say supposed to work because I will be the first to admit that my points aren’t perfect. I know how to align the angles, but they are tiny, bias angles after all, so they don’t always behave every time.)

Now, let’s move to the other side. Again, align the piece so that your 1/4″ seam allowance will align with the valley at the top and bottom.

Press and double-check to make sure that the top point is 1/4″ in from the top edge of the block.

So – that’s how it’s done.
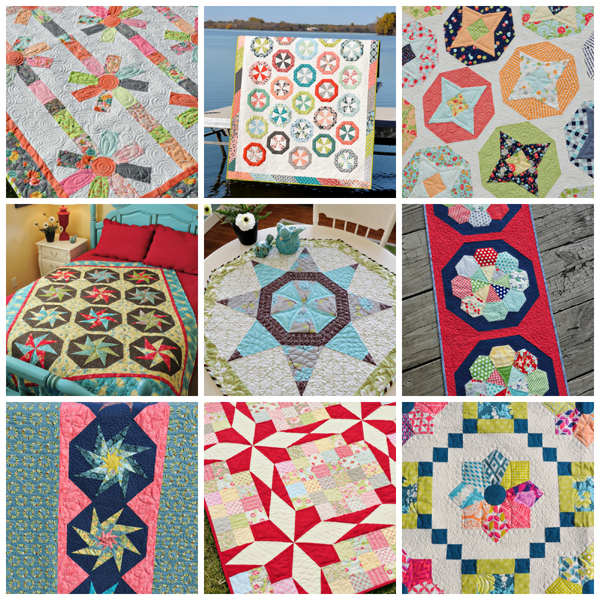
Now that you know how to do those angles, you could use that knowledge to make any of these quilts.

Again, those are all made with my Triangler ruler – but the quilts below are all made using a 60-degree ruler like this one, and that same technique works.

(Quilts from this book and this pattern)
I hope that helps clear up the mystery. And just remember – this does take some practice, but once you get the technique down, it’s fun to do. Being able to sew angles really opens the door to many possibilities. Once you get the technique down, you will be capable of making lots of unique things!


Wonderful tutorial on the corners, perfect for all levels of experience. I love the projects in the new book and am looking forward to using my ruler from book one for these projects!
Thanks. I have one cut out but have not had a chance to start piecing.
Thank you for sharing this valuable information. I’ve been putting off working with triangles (other than half square triangles) for this main purpose. I think I’ll give it a try now. Thank you!
Thank you for the help. Great information. I’m working on Petals on a String.
Thank you Heather for this great tutorial!! This helps a lot!! I’m excited to make Toppers to go underneath my lamps, but must admit triangles can be a little scary!! Seems like your always afraid to cut into that beautiful fabric and make a mistake! Yikes!! I think I’m going to use some of my fabric stash and make a trial one first before cutting into my good fabric! So, thank you for taking the time to show us how this is done! Have a wonderful day!
Excellent tute! I’m sharing this with my quilting buddies.
That is the best tutorial I have read. You are a wonderful teacher.
Wonderful tutorial!!
Thank you Heather! That is wonderful information and explained so well. Now I am ready to use your ruler (which I’ve had for a while) and make one of your patterns.
I’ve ordered your ruler and your new book and am looking forward to using them. This refresher on sewing the pieces is very much appreciated.
Great tutorial! This helps so much!
Heather, this is the best tutorial I’ve seen on this subject. My new-to-quilting niece wants to tackle a triangle quilt. I’m going to send her the hyperlink to this post, as well as the excellent ones you have written on binding. Thank you so much for sharing!
Thanks Healther. You give the best tutorials!!!!!! Now I can try making one of the projects that I have been putting off in you Angles With Ease book!!!!!
What an awesome tutorial! I’ve got your ruler and book, and Petals on a String was going to be my next project. This information will be SO helpful. Thank you!!!
Thanks for all the angle tips and especially for the boys pics!!
Those boys are the cutest! Your timing for the tutorial is impeccable. I got my triangle in the mail yesterday and should be getting your second book any day now. Thanks again for taking the time to encourage, share and teach others. God bless you and your family for sharing you with us!
Great tutorial that anyone could benefit from. Thanks.
Thank you! I am doing a chevron quilt and struggled with the first row. I found this tutorial, and WHAT A DIFFERENCE! I thought I knew what 1/4″ looked like, but my trusty 1/4″ guide is now my new best friend. Fabulous tutorial!!!
That is the best answer to a problem ever! Thank you.
Heather, that was an excellent tutorial on “Tips for Aligning Triangles.” Thank you very much!! I will use this information for all my future projects.